How to sew a double-sided strap
March 9, 2008 at 7:48 pm 18 comments
I spent today designing and sewing a new style of bag that I’m really excited about. I finally figured out some stuff with applique stitching (who knew you needed a special foot?!), which I’ll get into in my next post.

In the meantime, I figured I’d take this opportunity to do a strap tutorial. As always, I must preface this with the good old “I’m completely self-taught, so just because I do it this way doesn’t mean it’s the right way” disclaimer.
1. Cut two strips of fabric (one for the top/outside and one for the bottom/liner) that are one inch wider and one inch longer than the measurements of your finished strap. I want my finished strap to be 2″ by 24″, so I cut two 3″ by 25″ strips of fabric.
2. Place the right sides together and sew along one of the long sides, leaving a 1/2″ seam allowance. Press the seam open.

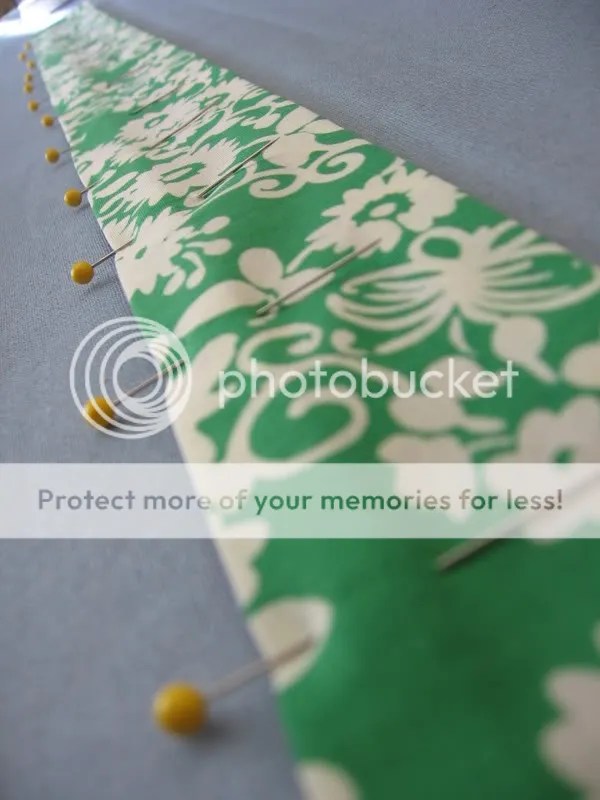
3. Lay the strap wrong side up on your ironing board. Fold the raw edges in 1/2″ and pin. (Hint: Since you’re just ironing and not sewing yet, you can use the ironing board as a “pin cushion” by pinning the fabric directly to the board.)

4. Press the folded raw edge.

5. Repeat on the other side.

6. Fold and press the two wrong sides of the fabric together.

7. Pin together the open seam.
8. Sew the two pieces of fabric together by stitching each long side at 1/4″ from the edge, then again at 1/8″ from the edge, so you end up with two lines of stitching on each side.

Hint: If your two fabrics aren’t the same color but you don’t want a contrasting stitch, use a different color thread on the main spool than on the bobbin. In this case, I didn’t want to use purple thread on the green fabric, or green thread on the purple fabric, so I used a spool of green thread on the top and purple thread for the bobbin. The green from the main spool peeks through the purple side just a little bit. I think it’s a nice effect.
9. Depending on your style, mood, energy level, etc., add as many lines of stitching as you’d like. I went with three on each side.

Congratulations, fellow crafter! You have yourself one fine-lookin’ strap. Use at your leisure.
Entry filed under: Handmade goodies.
18 Comments Add your own
Leave a comment
Trackback this post | Subscribe to the comments via RSS Feed


1. Betty | March 10, 2008 at 9:18 am
How did you kow that I needed help doing this? You read my mind. I am convinced of it. This needs to be going to both craftzine and sew mama sew asap! I’ll send ’em an email if there hasn’t been one sent yet. Very easy looking tutorial–I can’t wait to try it,
2. Jennifer H. | March 10, 2008 at 5:39 pm
Well that is MUCH easier than the way I was doing it! Did you know it is very hard to turn a little tube inside out?! 🙂
3. becca | March 10, 2008 at 10:02 pm
Wow, this is so well-timed! So easy to understand, just perfect. Thanks!
4. Jenaveve | March 10, 2008 at 11:22 pm
Love this tute! Thank you – and the pics are so crisp and bright.
I love that you are self-taught and prepared to teach others; that actually makes your instructions so personal and easy to follow.
I just love the fabric! What kind of materials are these? (This is the question I always need help with!)
5. emily august | March 11, 2008 at 9:05 am
This is great! Thank you.
I usually try to make straps using a much harder method that never works out. I have to try this one. 😀
6. Felis | March 11, 2008 at 10:46 am
It’d be super simple to add a piece of woven interfacing cut just a schoch shy of the width and adding that to give it some more body too. Good tutorial!
7. belle | March 11, 2008 at 1:20 pm
Thanks for the very clean very clear tutorial, I really appreciate tutorials about the simpler tasks. I love that you gave hints throughout. Very down to earth and friendly!
8. Cathy | March 11, 2008 at 10:50 pm
Good tutorial, clear pictures – I just hate pinning and measuring. To make this belt I would cut the pieces, layer them right sides together, stick a few pins to hold in place and stitch the long sides only with a 1/4″ seam using the side of the zigzag foot as a guilde. Press the long sides by inserting a yardstick inside the tube to press the seam on. Sew one short end up, clip the corners and turn right side out (the yardstick can help here too as a pusher). When you press the belt you will notice how nice, flat and flat your long seams are. You might have to pull the short side out with a pin. Tuck the other short iside n 1/4″ press well. Then do your topstitching using the side of the foot for 1/4″ and use the zipper foot to edgestitch.
9. s. | March 14, 2008 at 6:55 am
I was going to say the same as the last person said! easier on you – less annoying measuring! and then you can still do the topstitching to make it look as pretty as yours. 🙂
10. Jessica | March 16, 2008 at 10:22 am
Whenever I make a strap/belt like this (using the tutorial way or poster Cathy’s way) my fabric starts getting bunched by the time I get to the middle of the strip (even though I have the two pieces pinned nicely together it seems like the top one keeps on getting pushed back by the foot and gets misalligned with the bottom one). Does this happen to anyone else? Do you know a solution? Sometimes if most of the strap is going to be hidden inside a casing, I just stop and start from the other side so I can meet in the middle – then I end up with the bunched piece in the middle where no one can see. I’d like a solution that doesn’t cause it to bunch at all, though 🙂
11. Cary | March 18, 2008 at 11:51 am
You have NO idea how much I needed that. I was laying in bed last night thinking, okay, how am I going to pull this strap off since I’ve never made one before.
Thanks so much!
12. Stacie.Make.Do. | March 18, 2008 at 2:19 pm
This is really nice. I think it looks much better this way than turning a tube – having tried both ways myself.
I think if you don’t like the bit of the other color thread showing thru to the opposite side you can just fiddle with your thread tension. I’m not good at that, but I’m pretty sure that is how to “fix” it if you wanted to.
I like the look you have here.
Jessica (comment above) might like to try a walking foot, or a teflon foot or see if she can adjust the pressure on her foot or feed dogs.
I found you through the link at Sew Mama Sew. So glad I clicked through!
13. tanja | March 18, 2008 at 4:04 pm
Thanks for the tutorial!
I love the hint part “Hint: Since you’re just ironing and not sewing yet, you can use the ironing board as a “pin cushion” by pinning the fabric directly to the board” – Great idea!
Greetings from Germany!
Tanja
🙂
14. Phyl | March 19, 2008 at 6:30 pm
I am gonna try this:).
I am having a bag give-a-way to celebrate my 200th post! Come here to check it out:
http://scrappynhappy.blogspot.com/2008/03/200th-post-woot-woot.html
15. artsycraftybabe | March 24, 2008 at 3:44 pm
Brilliant! I make double sided straps all the time and have never attempted it this way. I think I’ll try your way next time.
16. Anne O. | March 26, 2008 at 11:27 am
I’m a beginner & I’ve just started to make my own hippy-style patchwork tops & totes & I’m so glad I came across this ultra awesome step by step for straps!! everything you make is perfect!
Here is one of the first little tops I’ve made, size NB
Thank you so much for posting, I love your blog!
♥Anne
17. D R E W | September 10, 2008 at 12:13 am
cool! i’ve been looking for away to make a strap like this for a while. this makes perfect sense!
18. Carrie | February 15, 2009 at 10:11 am
Sending blessings your way because, you totally saved the day!
Great tutorial thanks so much, I have been looking for exactly this!